How Do I Change The System Time Zone?
In this article, you will learn how to change the system time zone on your Mvix device. There are nine standard time zones:
- Atlantic Standard Time
- Eastern Standard Time
- Central Standard Time
- Mountain Standard time
- Pacific Standard Time
- Alaskan Standard Time
- Hawaii-Aleutian Standard Time
- Samoa Standard time
- Chamorro Standard time
Your Mvix device should be preconfigured with the correct time zone when you receive it. If you switch locations and the system time is no longer accurate, you can change the time zone by following these steps:
What You'll Need:
- A Mvix Device
- Physical access to your Mvix signage device
- A USB computer mouse and keyboard
If you meet the requirements listed above, simply follow the steps below to change the time zone.
Changing the Time Zone

- Start the Mvix device and wait for your signage to display.
- Plug in a mouse and a keyboard into the two USB ports on the side.
- On the keyboard, press and hold down the "ALT" key, and press the "TAB" key.
- If you do not see a "Tab" key, look for a key with two arrows pointing in different directions as shown in the following image.

- Entering Alt+Tab should make a menu bar appear.
- Alternatively, you can open a terminal with CTRL+ALT+T
16.04 Devices
- Click on the time shown on the menu bar.
- Click on “Time & Date settings…”


- Click on the “Location†text box and delete all the text that is already there.
- Type in the name of a nearby city.
- Click on the option that matches the location you wanted, i.e. Los Angeles, CA instead of Los Angeles, TX.


- Click on the red "X" button on the top left corner of the "Time & Date" window.
- Reboot your device.
- When your device starts again, the time zone should be correct.
18.04 Devices
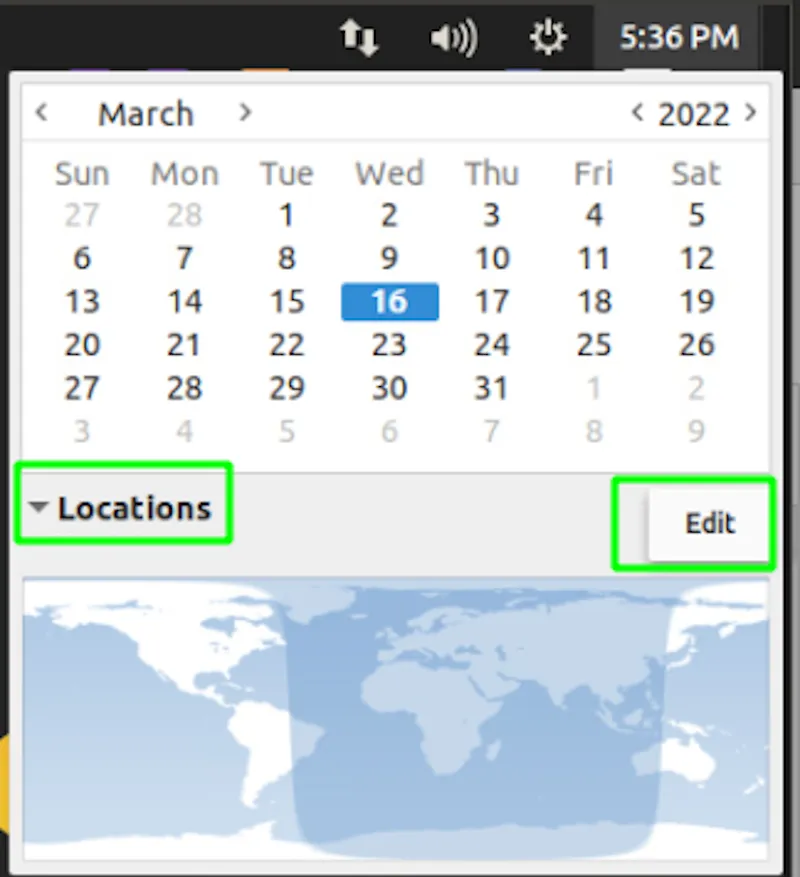
- Click on the Clock on the top right of your screen.
- Select the Locations dropdown and click Edit.

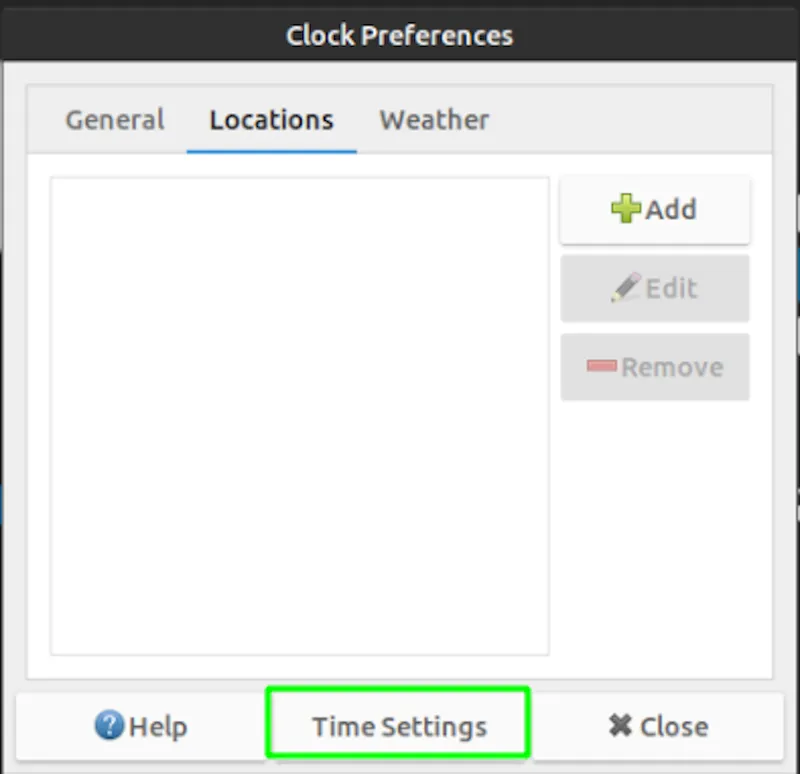
- From here, you can add a new location to adjust the selected Time Zone.

- Add your Location name, and specific Time Zone, and Save.
- *Add Lat and Long if preferred, as this is optional.

- If you would like to manually adjust the time, you can do so from this menu as well. Select Time Settings to do so.

- From here, adjust the time and date settings as necessary, then save with Set System Time.

20.04 Devices
- Click on the clock in the top right corner.

- Select the Time and Date Settings to manage the Time settings specifically.
- To adjust the Time Zone settings, select Edit on the Time Zone field.

- Once done, select Save.

- If you would like to adjust the time values directly, turn off the NTP sync.

- Once toggled off, the time and date values will be selectable and can be edited. Save when finished.

Let Us Do It For You!
Fresh and relevant content is the cornerstone of a successful digital signage campaign. Don’t have time to manage your Digital Signage System or do you want your screens to look professionally designed? Let us do it for you. We will manage your digital signage screens for a fraction of the cost and minimize downtimes. Learn more about our Managed Service Plans.

Problems, Questions, Corrections: If you have any further questions, problems, or corrections you would like to see made, please open a support ticket.


