How do I set up BrightSign with a Mvix Flex License on CMS?
We have partnered with BrightSign to provide a digital signage solution that combines the best player in the market with the most content-rich software. BrightSign manufactures media players and networking solutions for the commercial digital signage market worldwide. BrightSign products are known for their signature reliability, affordability, ease of use, and market-leading technology. Mvix can confirm that Series 3, Series 4, and Series 5 XC5 BrightSign devices are compatible with Mvix Flex device application.
Please Note: Series 4 players do not support the AV1 video container/code.
Depending on your Digital Signage needs and requirements we do recommend the BrightSign XT and BrightSign XD models. These models have sufficient hardware required for more complex signage solutions.
Here are some features of this player:
- Full-screen and multi-zone layout and support for all markets including corporate communications, educational institutions, and more.
- Landscape and portrait support
- Offline playback of media
- Video, Images, Webpages, RSS and HTML5
- Remote setup and configuration using Brightsign B-Deploy
- Remote updates
- Reporting
Flex Requirements for BrightSign
- Purchase a supported BrightSign device (BrightSign Series 5 and Series 4 products)
- Empty MicroSD card (64GB or larger)
- MicroSD card reader
- Wired ethernet network connection
- USB keyboard (optional)
- Purchase an Mvix Flex software license (contact your Mvix Solutions Consultant for more information)
Contact your Mvix Solutions Consultant for more information on purchasing a Mvix flex software license or BrightSign media players.
Update the OS on your BrightSign Device
- Before you begin, we recommend that you update your BrightSign device to the latest OS version.
- BrightSign operating system downloads and installation instructions are located here:https://www.brightsign.biz/downloads/overview
Set up your BrightSign Device
- Connect the Ethernet cable and/or keyboard, and insert the empty MicroSD card. Connect the BrightSign device’s power and HDMI cables.
- For setup using a connected USB keyboard, offline configuration is required. In this case, you can use the TAB key to navigate around the screen and Enter to activate buttons.
- For online setup, connect your device via Ethernet, and the following screen will appear:
- Wait for the device setup screen to appear.
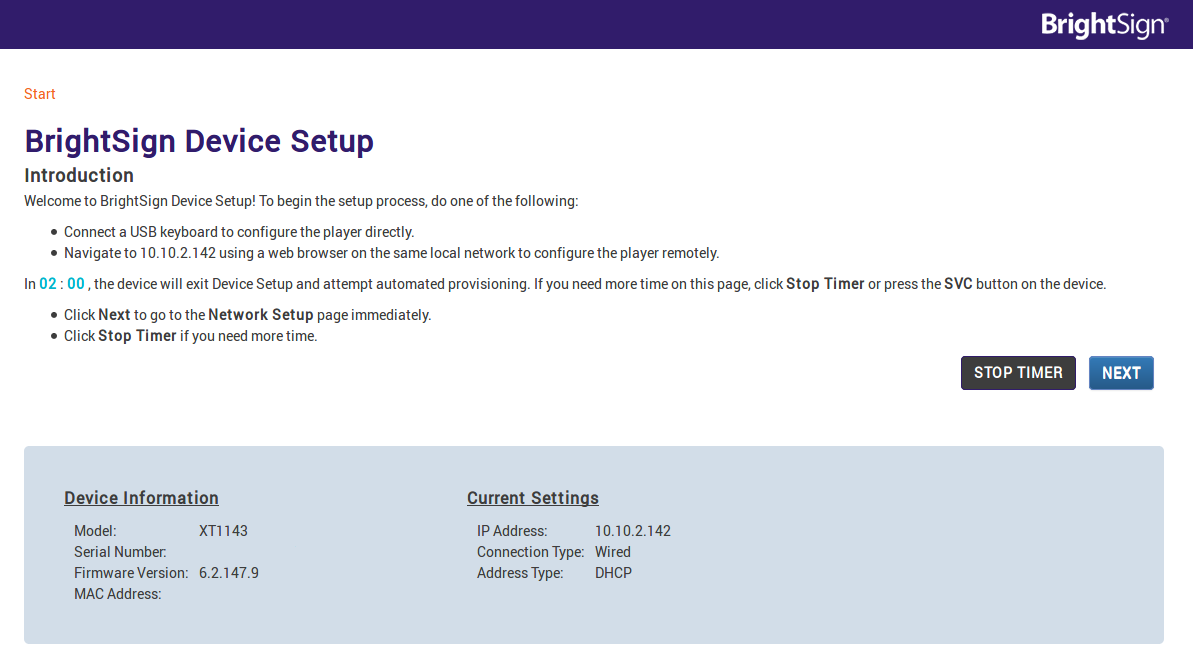
- Click Next.
- Select “Ethernet” on the following screen, then select “Use Current Settings”.
- If you have purchased your device with Wi-Fi hardware and would like to use that instead of Ethernet, select “Wifi” instead of “Ethernet” and follow the “Wireless network setup” instructions (located at the end of this document) at this point.
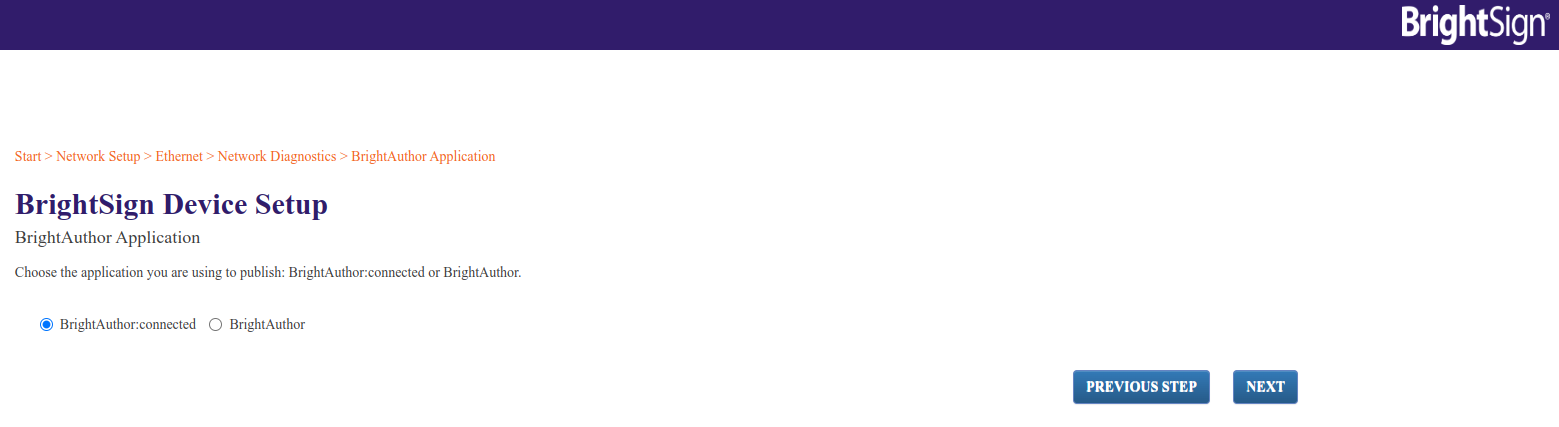
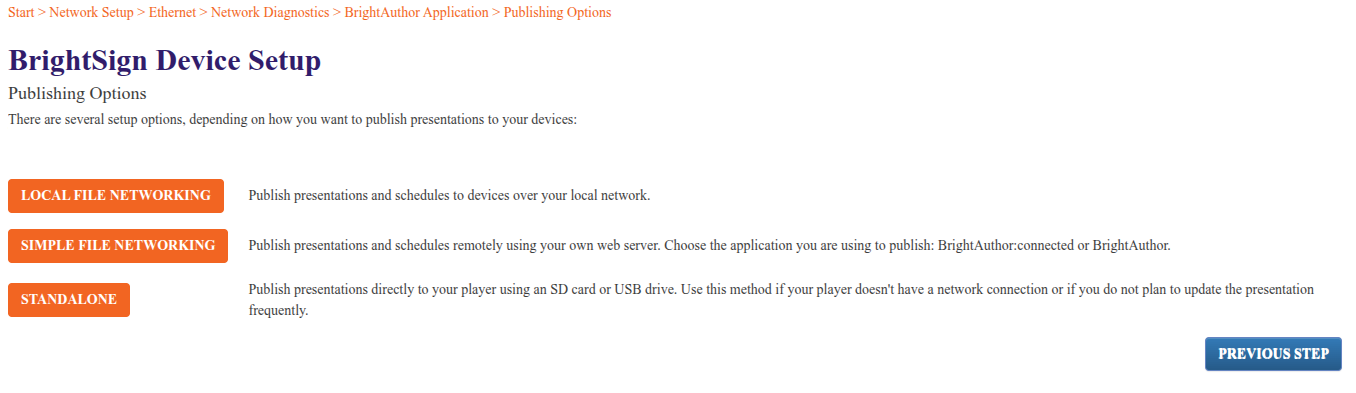
- After the network diagnostics finish, click “Next - BrightAuthor Application”.
- Once you arrive at the BrightAuthor Application screen, select BrightAuthor:connected
- A screen will appear giving four options. Select "Standalone".
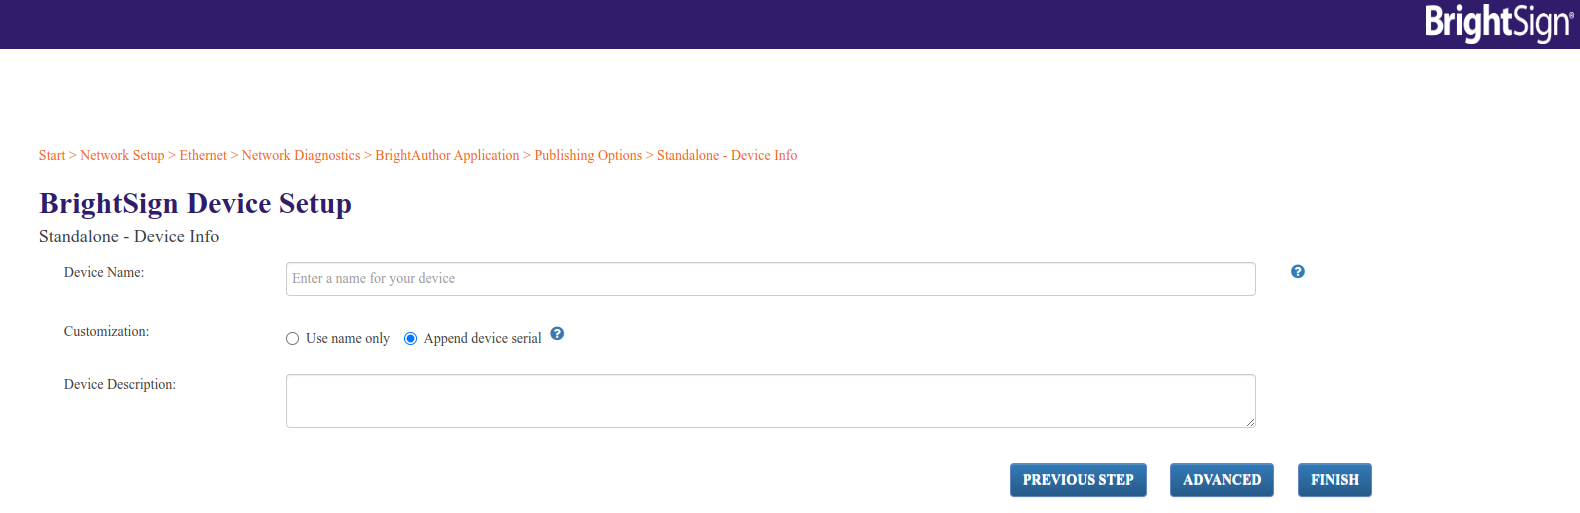
- Enter your desired device name (do not use spaces, or special characters other than “-” and ”_”). Select “Use name only”. Enter a description for the device if desired.
- Click “Finish”.
- Allow time for your device application to install
Install the Flex App for BrightSign
- Remove the MicroSD card from your player and insert it into your computer.
- Erase all files from the MicroSD card so that it is completely blank.
- Download the application autorun.zip file to the MicroSD card from the link provided by Mvix Client Success. The autorun.zip file should be the only file on the MicroSD card.
- It is important to ensure that the file is named exactly autorun.zip for the device to properly recognize the file and proceed with installation.
- Remove the MicroSD card from your computer, and put it back into the player.
- Press the RESET button on the player.
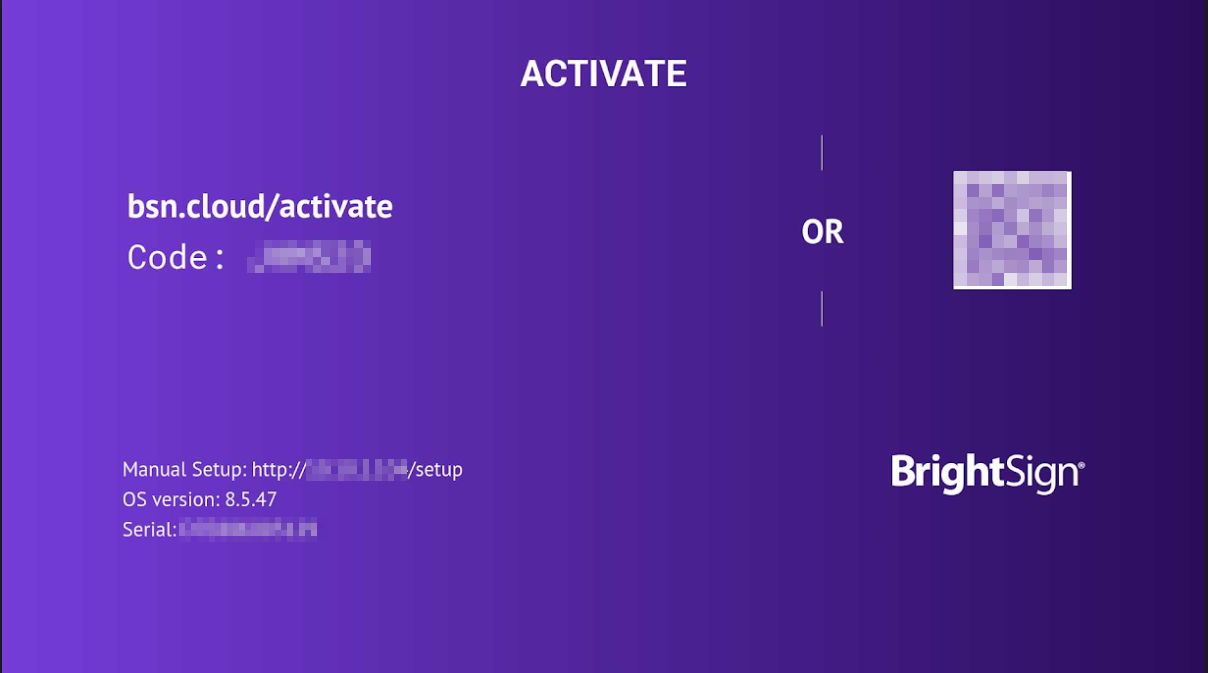
Activate Your Device
- Power on your BrightSign device and wait for it to initialize.
- The app will continue loading, and then you will be presented with the activation screen:
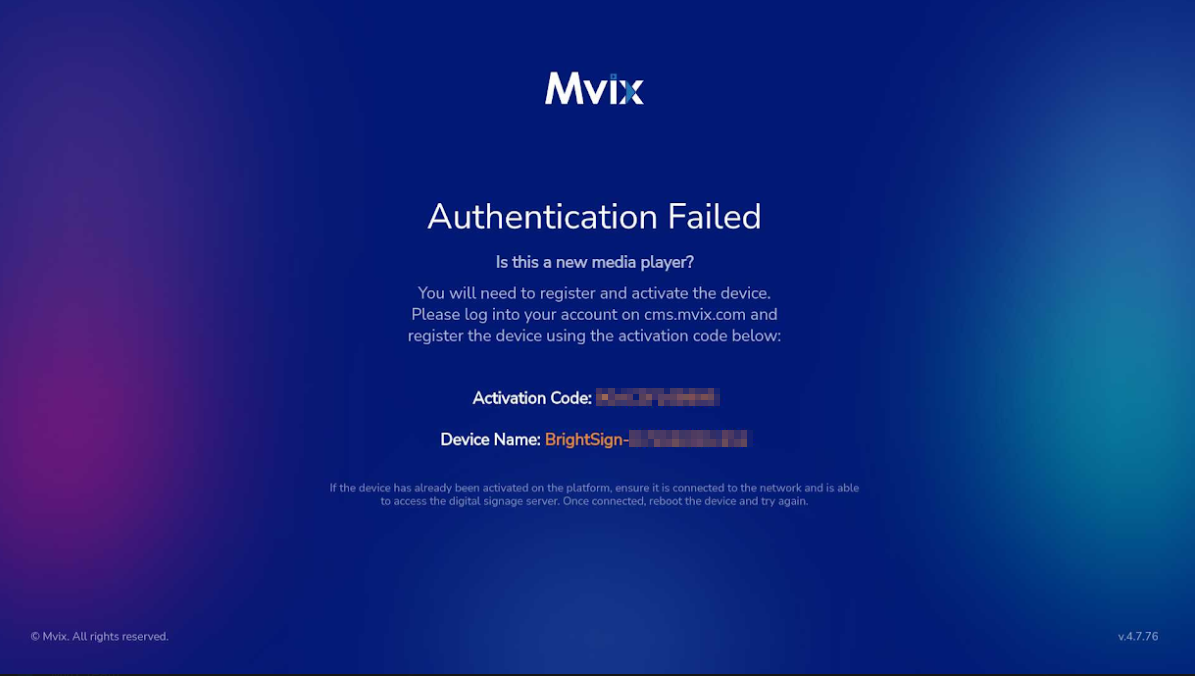
- Email the Client Success Team (support@mvix.com) to activate your player with your preferred player name and Device ID as supplied on screen.
- The Mvix Client Success team will review your activation details and set up your client account along with your device registration - this process is usually completed within 1 business day.
- Once your device is activated, the activation screen will disappear, and the device will begin playing Mvix sample content.
- If you are leveraging WiFi, please let us know the MAC Address of both your LAN and WiFi adapters to properly activate your device in Mvix CMS.
Schedule Your Content
- Your device setup is now complete, and you can access cms.mvix.com using your account login credentials.
- Moving forward, you will use the CMS to schedule and manage your devices and their playback content.
- Enjoy!
Wireless Network Setup (Optional)
If you have already finished setting up your device and are using a wired network, you may disregard the instructions in this section. If you have purchased a device with Wi-Fi hardware installed, however, and would like to connect your device to a wireless network, the following are instructions for configuring this.
Note: To make changes to your device’s wireless network connection later on, you must follow BrightSign’s instructions at https://brightsign.zendesk.com/hc/en-us/articles/218065977-Performing-a-factory-reset to factory reset your device. This process will reset your device’s configuration to the same way it was when you first received the device, but will not affect any signage content scheduled to your device via the CMS, and your device will remain activated on Mvix Signage. After doing so, repeat step 2 (“Prepare your BrightSign device”) above with a separate microSD card or USB drive.
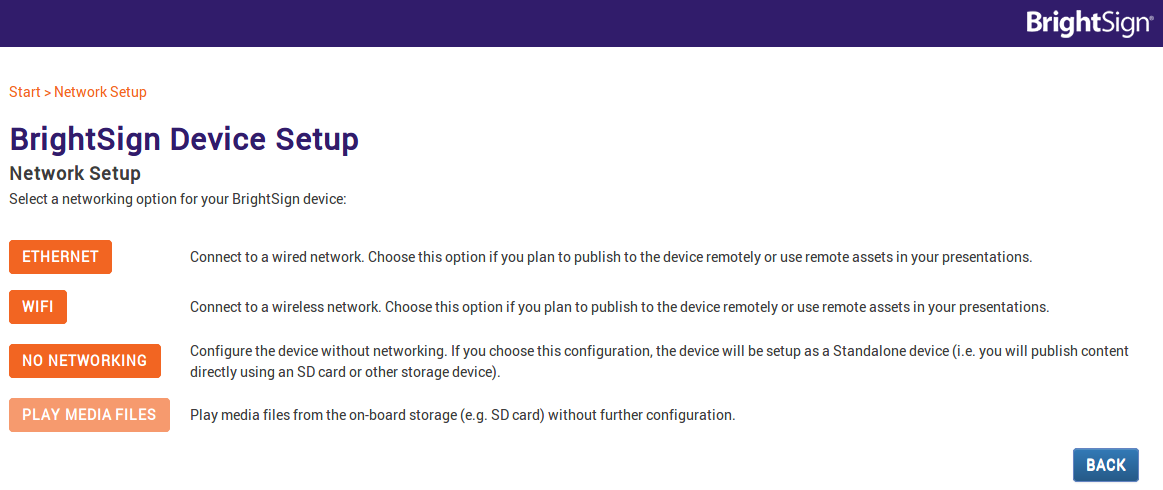
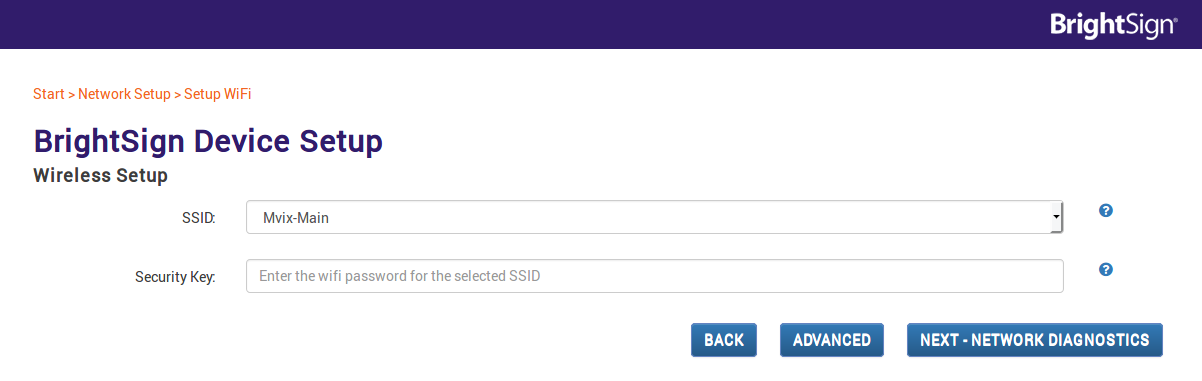
To set up your device on a wireless network, when you get to the “Network Setup” screen (pictured, right) select “Wifi” instead of “Ethernet”.
Afterwards, you will be taken to the “Wireless Setup” screen (pictured, below.) At this screen, select your wireless network’s SSID and enter the security key if applicable. After doing so, click “Next - Network Diagnostics”. If you need to configure a static IP address, a proxy server, and/or a custom time server for your device, select “Advanced” instead.
Once this is complete, continue from step 3 (“Install the Flex app for BrightSign”) above, unless you have already done so.
Please refer to the following table for content guidelines:
Touchscreen Interactive Content
For touchscreen interactive content, both BrightSign Series 5 (XC, XT or XD) and Series 4 (XT or XD)hardware is supported. Published touchscreen content is limited to a maximum of 1920x1080px resolution.
Touchscreen content requires an Mvix Select Suite Subscription. Contact your Solutions Consultant for more information.
Custom Resolution Guidelines
The Mvix Flex BrightSign app is designed for use with 16:9 aspect ratio displays having a resolution of either 1920x1080 (1080p) or 3840x2160 (4K). When using displays/content with a custom resolution or non-16:9 aspect ratio, content playback may be letterboxed or cut off on your display.