Queues are one of the most useful ways to handle lines by far. This has shown to be improvements to organizations such as hospitals, government offices, banks, customer service centers, and more.
But how do you showcase the queue status to your visitors?
While you could utilize an old-fashioned led counter, Mvix CMS offers a a more visually stunning method to display your queues on your displays. Simply follow the steps below to set up Queue Management.
What You’ll Need
- An Active Mvix CMS Account
- An Active Select Suite Plan
- Internet Connectivity
Getting Started
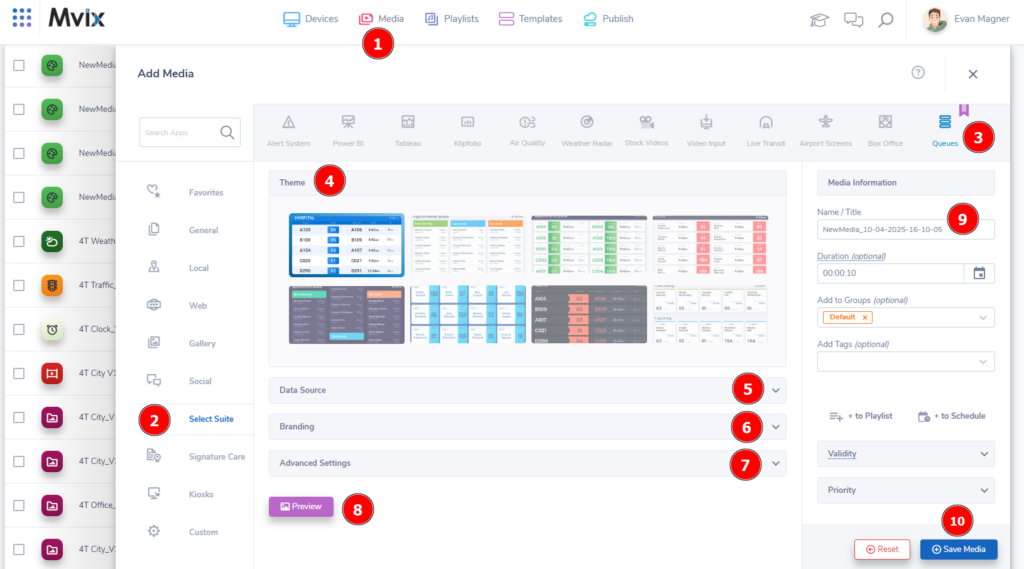
- From the CMS, first (1) hover over the “Media” module then (2) select “Add Media”.
- The above popup window should appear. To access the specific app, (3) click on “Select Suite” group and (4) select the “Queues” icon to open the app.
Setting Up The App
- First, you’ll want to select a theme. Simply (4) click on the theme that you like best to select one.
- Next, you’ll need to (5) add a data source. We offer three options:
- Add/Edit Items: This is for those who would like to manually enter the data.
- Import File: Import a file directly from a drive or your computer.
- Web Feed: This automatically pulls .csv, .json, or .xml feeds directly from the web.
 Tip: If you are unsure on the correct formatting for the Import File or Web Feed, there are Sample FIles located under each tab.
- After your Data Source is ready, you can edit the font family and colors through the (6) “Branding” dropdown.
- To change your language, title, end text, “No Data” message, or animation/service duration, use the options available in the (7) Advanced Settings dropdown.
- When your setup is complete, we recommend (8) click “Preview” to ensure the setup is done to your satisfaction.
- Lastly, be sure to (9) name your media file something easy to reference and (10) click “Save Media” to save your queue to the Media Library.
Problems, Questions, Corrections: If you have any further questions, problems, or corrections you would like to see made, please open a support ticket.
