One of the best social proofs you can have for your business are honest and descriptive reviews of your company and services.
However, most of the time people would ever see these reviews is through an online search.
With digital signage however, you’ll be able to put these reviews front and center to your audience. With the Mvix CMS, you’ll have the ability to either automatically display reviews from online sources (Google, Yelp, or Facebook) or upload them manually.
 Tips & Tricks: This app is perfect to add to the side or bottom of your template to help underline your main zone.
What You Need
- An Mvix Standard Player or Flex Standard plan.
- Internet Connectivity (If using an online source)
- An account with the selected review source
Getting Started

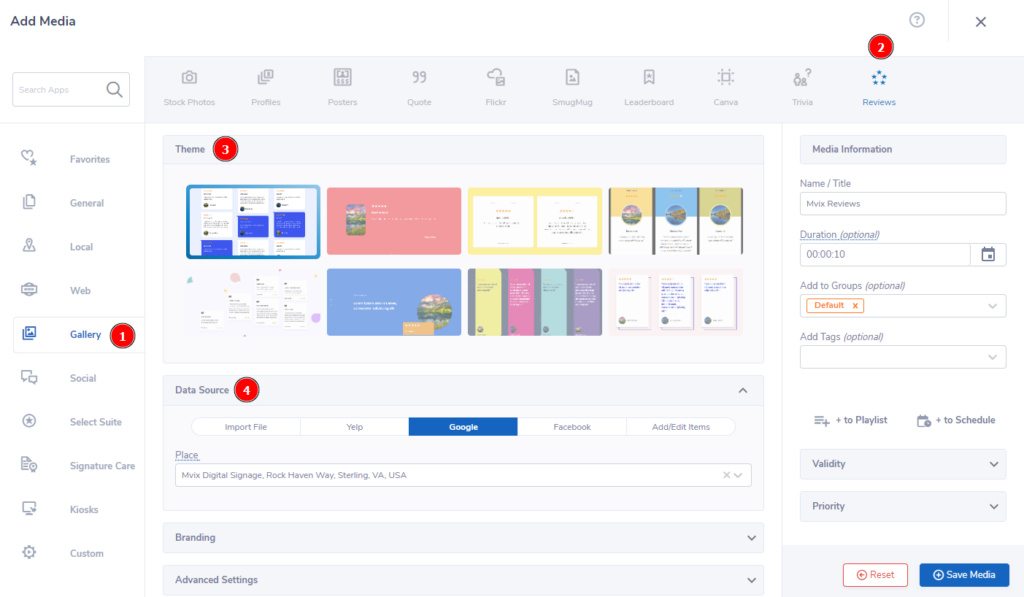
- From the Add Media Module, (1) select the “Gallery” category then (2) click on the “Review” application.
- When the app loads, you’ll see the below screen. First, you’ll need to (3) choose from one of the available themes.
- Next, you’ll select from (4) one of the available data sources. These are:
- Import File – Upload a CSV or XML file following the layout shown in the Sample Files at the top.
- Yelp – Utilize your Yelp account by entering your “Business ID”. (This is the text at the end of the URL, after /biz/)
- Google – Showcase your Google Reviews. Simply search your businesses address or name in the “Place” field. (Please note: you may have to be very exact when searching your address by adding in a relevant city or zip code)
- Facebook – Highlight Facebook reviews by connecting your account to Mvix CMS.
- Add/Edit Items – Manually enter the name, rating, location, image, title, and text.
Final Edits

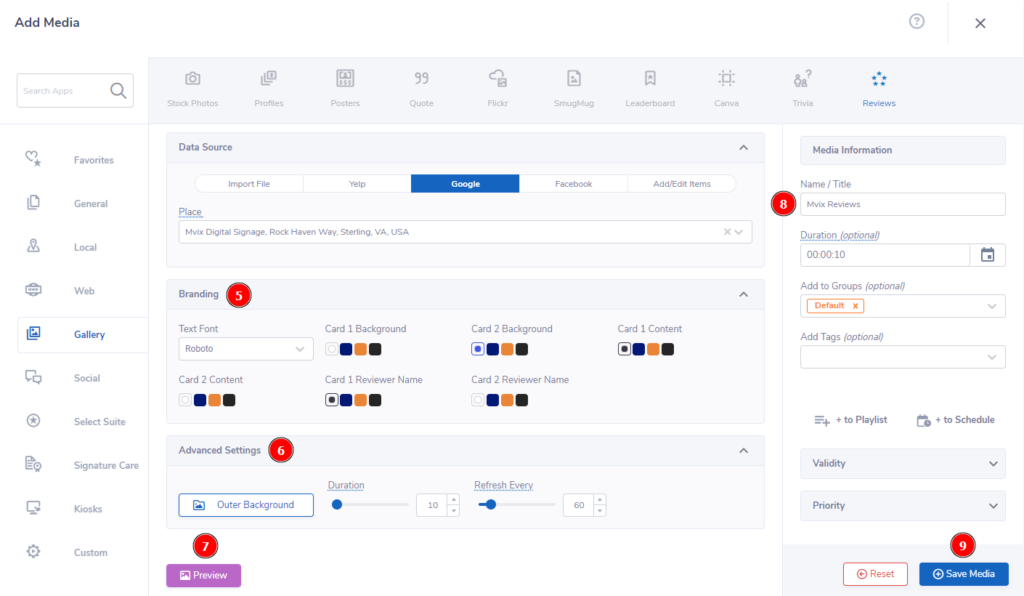
- After you choose your data source, you can edit the font or colors (5) under “Branding” or change the background or animation duration (6) under “Advanced Settings”. (Note: Your animation duration should last long enough to be able to reach the complete review)
- Lastly, we recommend (7) clicking “Preview” to confirm if your design fits your needs. After that, simply (8) type a Name/Title that will be easy to remember and then (9) click “Save Media” to add it to your Media Library.
 Problems, Questions, Corrections: If you have any further questions, problems, or corrections you would like to see made, please open a support ticket.
